How to Make a Brochure on PowerPoint: 7 Easy Methods


How to make a Brochure on PowerPoint with step-by-step methods. Learn how to create a brochure on PowerPoint using 7 tried and tested methods.
How to Make a Brochure on PowerPoint: 7 Methods Explained in Detail
Creating a professional brochure doesn’t require technical expertise or complex design tools; instead, you can do it using Microsoft PowerPoint. In this guide, I’ll show you how to make a brochure on PowerPoint using 7 simple methods, with clear instructions.
I will cover different approaches so you can choose what works best for your needs, including ready-made templates, AI-powered layouts, and more.
By the end of this guide, you will clearly understand how to create a brochure on PowerPoint using multiple techniques, and you’ll be able to apply the right method based on your design requirements.
To give you a clear understanding of why this approach works so well, let’s first look at what makes PowerPoint the best choice for creating a brochure.
Why Use PowerPoint for Brochure Design
Microsoft PowerPoint is a practical choice for brochure design because it comes with powerful design features:
- Beginner-friendly interface
- No design skills required
- Several slide size settings:
- A4
- Letter
- Custom dimensions
- Built-in icons, shapes, and design tools
- Compatible with multiple formats:
- PPT
- Images
- Quick editing and sharing
- Supports:
- Tri-fold
- Bi-fold
- Custom brochure layouts
- Reusable templates via Slide Master
- Works offline without needing internet access
That’s why it’s one of the easiest tools when learning how to make a brochure on PowerPoint.
Types of Brochures You Can Create in PowerPoint
Using Microsoft PowerPoint, different brochure formats can be created based on content and purpose. Common types include:
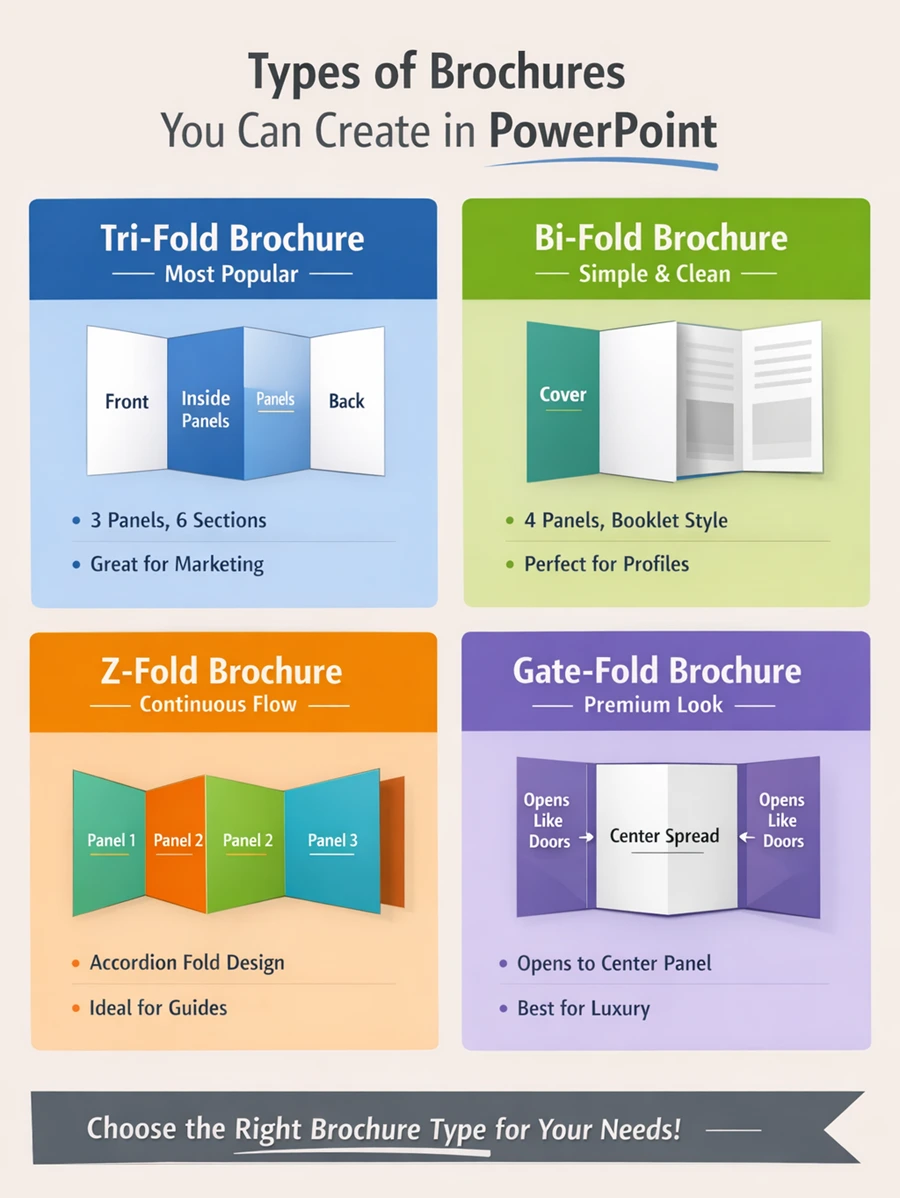
- Tri-fold brochure
- Bi-fold brochure
- Z-fold brochure
- Gate-fold brochure
Choosing the right format helps structure your content better. Once you’ve decided on the brochure format, the next step is to bring that structure into PowerPoint.
How to Make a Brochure on PowerPoint
Now that the format and structure are clear, it’s time to start making the brochure in PowerPoint. The approach you choose will depend on how quickly you need the brochure ready. You can either create everything from scratch or use an AI-powered solution to make everything ready in minutes without any manual intervention.
Let me start explaining with the most straightforward manual method.
#Method 1. Manual Design from Scratch
Manual design works best when a completely custom layout is required instead of ready-made templates. Every element, such as layout, content placement, and other elements, is created step by step. Although it may take a bit more time. Still, if you want to start from scratch, follow these steps on how to create a brochure on PowerPoint:
- Open PowerPoint
- Go to:
- Design
- Then, Slide Size > Custom Slide Size
- Choose A4 or Letter size
- Set orientation to Landscape
- Now, create columns:
- Go to Insert > Shapes > Rectangle
- Divide the slide into 2 or 3 equal sections, based on brochure type
- Use View > Guides to align everything properly
- Afterwards, add background and branding:
- Right-click on the slide > Format Background
- Apply
- Color
- Gradient
- Image
- Insert logo and brand elements
- Add headings, subheadings, and body text. Use bullet points to keep it readable.
- Add images and icons
- Go to Insert > Pictures / Icons
- Use clear and high-quality visuals
- Insert dividers, or boxes
- Adjust colors to match the theme
- Use 2-3 font styles to maintain professionalism
- Lastly, export your brochure by pressing the File > Save As > PDF button.
Once the manual design is complete, the brochure is ready. However, not everyone prefers starting from scratch. In such cases, using ready-made templates can simplify the process. Next, I’ll share the same.
#Method 2. How to Make a Brochure on PowerPoint Using Built-in PowerPoint Templates
PowerPoint already includes pre-designed layouts with proper spacing and color themes, which helps save time in creating it from scratch.
You can replace content, and basic customizations like colors and fonts can be adjusted to match specific requirements. Here’s how:
- In MS PowerPoint, go to File > New.
- In the search bar, type “Brochure.”
- Browse the available designs, and select a layout that fits your brochure type.
- Click Create.
- Replace the existing text with your own content. Update headings and details.
- Insert your own images or replace existing ones (optional) by clicking on the Insert > Pictures button.
- You can change colors using Design > Variants. Also, modify fonts if needed.
- Once customization is done, start exporting the brochure by clicking on the File > Save As > PDF button.
#Method 3. How to Create a Brochure on PowerPoint Via PowerPoint Designer
Templates make the process quicker and easier, especially for standard brochure designs. If you want to make the entire procedure automated with layout suggestions based on your content, PowerPoint also provides an AI-driven feature that can generate design ideas instantly.
For the same, follow the steps below:
- Open PowerPoint and insert your text, i.e., headings, descriptions, and content.
- Add relevant images to your slide by clicking on the Insert > Pictures button.
- Click on the Design tab > Design Ideas.
- Browse the suggested design options.
Click on any layout to apply it.
- Now, adjust elements, i.e., text or images, if needed to match your requirement.
- Once everything is done, click the File, then Save As > PDF to export the brochure.
This approach helps speed up the design process by automatically suggesting layouts, but you have to make adjustments yourself. For more professional use cases, another option is to work with Slide Master settings.
#Method 4. Using Slide Master
Slide Master is useful when a consistent design needs to be applied across the entire brochure. It allows you to define:
- Fonts
- Colors
- Layouts
- Placeholders in one place
To do so, here are the step-by-step instructions to follow:
- In PowerPoint, click on the View tab > Slide Master.
- Choose a master slide or layout below it.
- To choose font styles, go to Slide Master > Fonts. Click Colors to define theme colors.
- Insert or adjust placeholders for:
- Text
- Images
- Logos
- Insert logo or branding elements that should appear on all slides.
- Create multiple layouts (optional).
- Click Close Master View to return to normal view
- Insert content into the predefined placeholders
- Finally, click on the File > Save As > Export as PDF.
If you need to maintain the same designs across the complete slide deck, then the Slide Master can be used.
#Method 5. How to Make a Brochure on PowerPoint Via SmartArt and Shapes
SmartArt and shapes can be used to present information in a more visual and structured way. Instead of plain text, elements like lists and key points can be arranged to improve readability. Here’s how:
- Click on Insert inside in PowerPoint > SmartArt.
- Choose a layout (List, Process, Cycle, etc.) Click OK.
- Enter your text inside the SmartArt placeholders. It is suggested to use short points instead of long paragraphs.
- Select the SmartArt Design tab. Change layout or colors as needed.
- You can add shapes by clicking on the Insert > Shapes option.
- Align shapes properly using View > Guides.
- Place SmartArt and shapes alongside text and visuals.
- Lastly, to export the brochure, click on the File tab, then Save As > PDF.
#Method 6. How to Create a Brochure on PowerPoint With Third-Party Templates
If you can’t find a template in PowerPoint according to your requirements, then use third-party templates. You can download them by searching “Best brochure templates” on any browser, selecting the best that suits your needs, and downloading.
Once downloaded, they can be opened in PowerPoint and edited just like any other file. For further modifications:
- Locate the downloaded file, and double-click to open it in PowerPoint.
- Click Enable Editing at the top.
- Select existing text boxes. Add your own headings and content.
- Click on images > Replace Picture (if needed). Insert your own visuals.
- Customize Colors and Fonts by hitting the Design > Variants to change colors. Modify fonts from the Home tab.
- Move or resize elements, and delete unwanted sections.
- Insert logo and brand-specific elements
- Finally, export the brochure by hitting the File > Save As > PDF.
Third-party templates offer more variety, especially when unique or modern designs are needed. However, for those looking to reduce manual effort even further, there are AI-powered solutions available that can help generate brochure layouts and content automatically.
#Method 7. How to Make a Brochure on PowerPoint Using an AI-Powered Solution
Creating a brochure using manual methods, templates, or even Designer can be time-consuming, especially if you want to produce more than 15. Since adjusting fonts, images, or text for multiple brochures becomes hectic.
So, to bypass these limitations, it is recommended to opt for the AI-powered solutions like MagicSlides AI Presentation Creator. It helps generate a ready structure based on the given content, which can then be edited directly in PowerPoint. Text, images, and design elements can be updated as needed by just writing text or a prompt.
Instead of creating a brochure from scratch and doing all the modifications manually, just write a prompt for what you need to add or change, and the rest, this AI Image Maker will do automatically.
Here are some key capabilities that make this approach more efficient for “how to create a brochure on PowerPoint”:
- Generates a complete brochure with text and images based on text or prompts
- Supports the quick creation of multiple brochures in one go
- Allows editing of text, images, and design elements directly in it, with just a text/prompt
- Option to convert PDF to PPT
- Works well on any browser (no installation required)
Still in doubt? Don’t worry! Just try this solution for free now, and follow the steps to create a brochure:
Step 1. Open the MagicSlides website in your browser and create an account using your email details.

Step 2. After logging in, select the option to “Get Started – Free.”

Step 3. Choose how you want to proceed, enter a prompt describing your brochure (such as purpose, topic, or content), or upload existing material.
Step 4. Define the structure by selecting how many sections or panels you want in your brochure layout. Click Enter to start creating a brochure.

Once generated, go through each section and adjust the content, images, and layout to match your expectations and requirements.
How to Make a Brochure on PowerPoint Hassle-free – Best Practices to Follow
Even a small mistake can ruin your brochure or presentation. If you want perfection in this process, keep these tips in mind:
- Keep text short and avoid long paragraphs
- Use 2-3 fonts only to maintain consistency
- Don’t overload sections with too many elements to maintain readability
- Keep proper spacing between text, images, and shapes
- Convert PPT to PDF for better sharing and printing
- Use clear and readable font sizes
- Avoid using too many colors
- Make sure images are not stretched or blurred
- Check for spelling and grammar mistakes
- Preview the brochure before exporting
Validating these points helps you to create an impactful brochure hassle-free.
Author’s Verdict
PowerPoint gives enough flexibility to create a brochure in different ways, such as custom templates or with built-in design tools. The right method mainly depends on how detailed the design needs to be.
For larger or repeated work, opting for this with manual steps can become tiring. In such cases, using tools like MagicSlides makes the process quicker by reducing repetitive work.
I hope you now have a clear insight into how to make a Brochure on PowerPoint step by step, according to your requirements.
People Also Ask (FAQs on How to Create a Brochure on PowerPoint)
Q. What is the best size for a brochure in PowerPoint?
A4 or Letter size in landscape orientation is recommended.
Q. Can I make a tri-fold brochure in PowerPoint?
Yes, you do it by dividing the slide into 3 equal sections.
Q. Is PowerPoint good for brochure design?
Yes, it’s one of the easiest tools for beginners and quick designs.
Q. Which method is best for beginners?
Using templates is the easiest method. However, many users find it difficult; instead, they opt for MagicSlides to generate a brochure hassle-free.


