How to Lock an Object in PowerPoint (Shapes & Images)


Learn how to lock an object in PowerPoint, including shapes, images, and text boxes. Follow simple steps to prevent objects from moving or being edited.
Have you ever carefully positioned an image, shape, or text box in a PowerPoint slide, only to accidentally move it while editing? Locking objects can help prevent these frustrating changes and keep your slide layout intact.
In this guide, you’ll learn how to lock an object in PowerPoint, including shapes, pictures, images, and text boxes. We’ll also cover how to lock multiple objects, unlock them when needed, and what to do if the Lock option isn’t available in your version of PowerPoint.
Does PowerPoint Have a Lock Feature?
Yes, Microsoft 365 PowerPoint includes a Lock feature that lets you prevent objects from being accidentally moved or edited. You can access the feature through the Selection Pane, where you can lock individual objects on a slide.
However, the exact availability and behavior of the Lock feature may vary by PowerPoint version and platform. If you don’t see a lock icon in the Selection Pane, you may be using a version that doesn’t support the feature.
What If You Don’t See the Lock Option?
If the Lock option isn’t available, you can still use a few alternatives:
- Group objects: Combine multiple elements so they move together.
- Use the Selection Pane: Rename objects and hide them temporarily while editing other elements.
- Use Slide Master: Place recurring background elements, logos, or design elements on the Slide Master so they aren’t easily changed during normal slide editing.
- Check for updates: If you’re using Microsoft 365, make sure PowerPoint is up to date.
For presentations with complex layouts, using the Slide Master alongside object locking can provide greater control over which elements can be edited.
How to Lock an Object in PowerPoint
PowerPoint makes it easy to position objects on a slide, but keeping them in place while editing can be challenging. The Lock feature prevents an object from being accidentally moved, resized, or edited, making it especially useful for complex presentations with multiple elements.
Step 1: Open the Selection Pane
Open your PowerPoint presentation and go to the slide containing the object you want to lock.
- Select the Home tab.
- Click Arrange.
- Select Selection Pane.
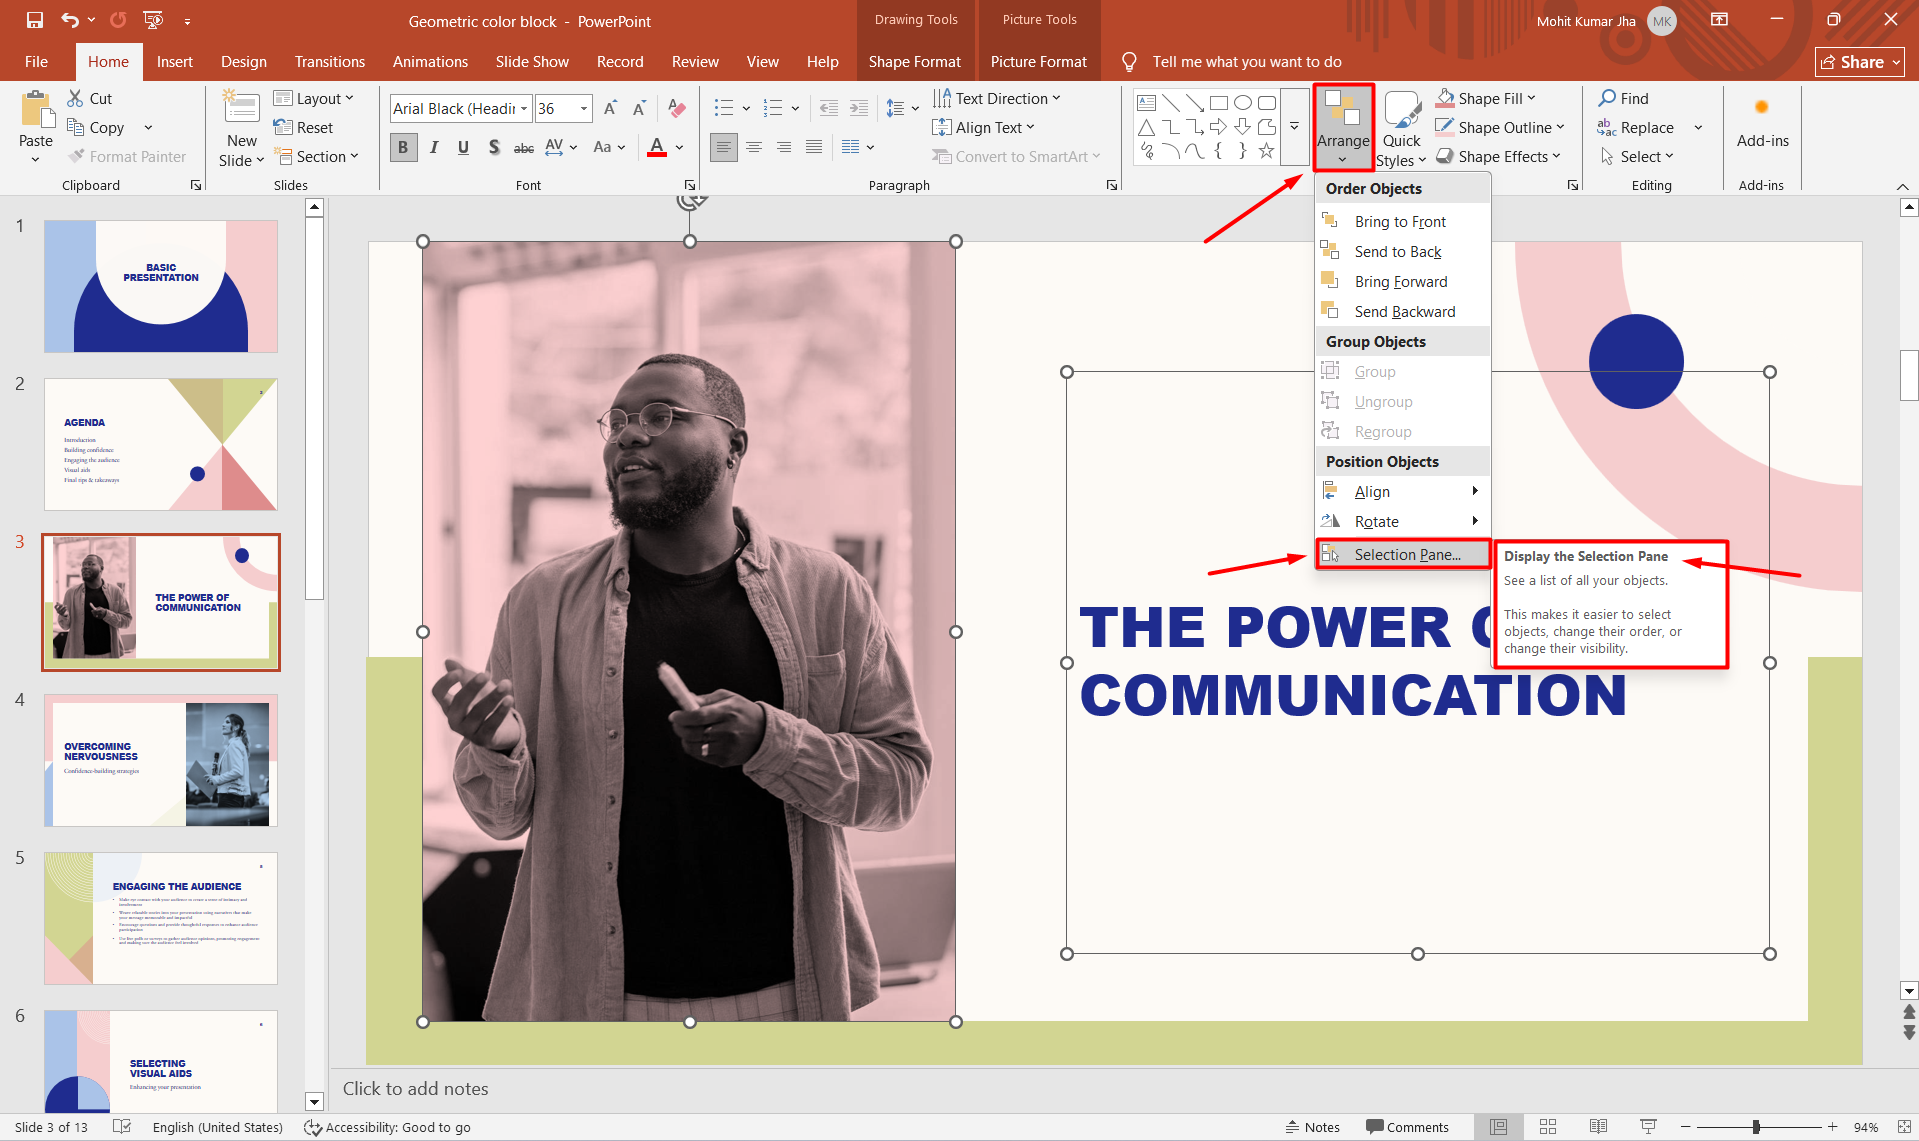
The Selection Pane will appear on the right side of your PowerPoint window, showing all the objects on the current slide.
Step 2: Find the Object You Want to Lock
Look through the list in the Selection Pane and identify the shape, image, text box, or other element you want to protect.
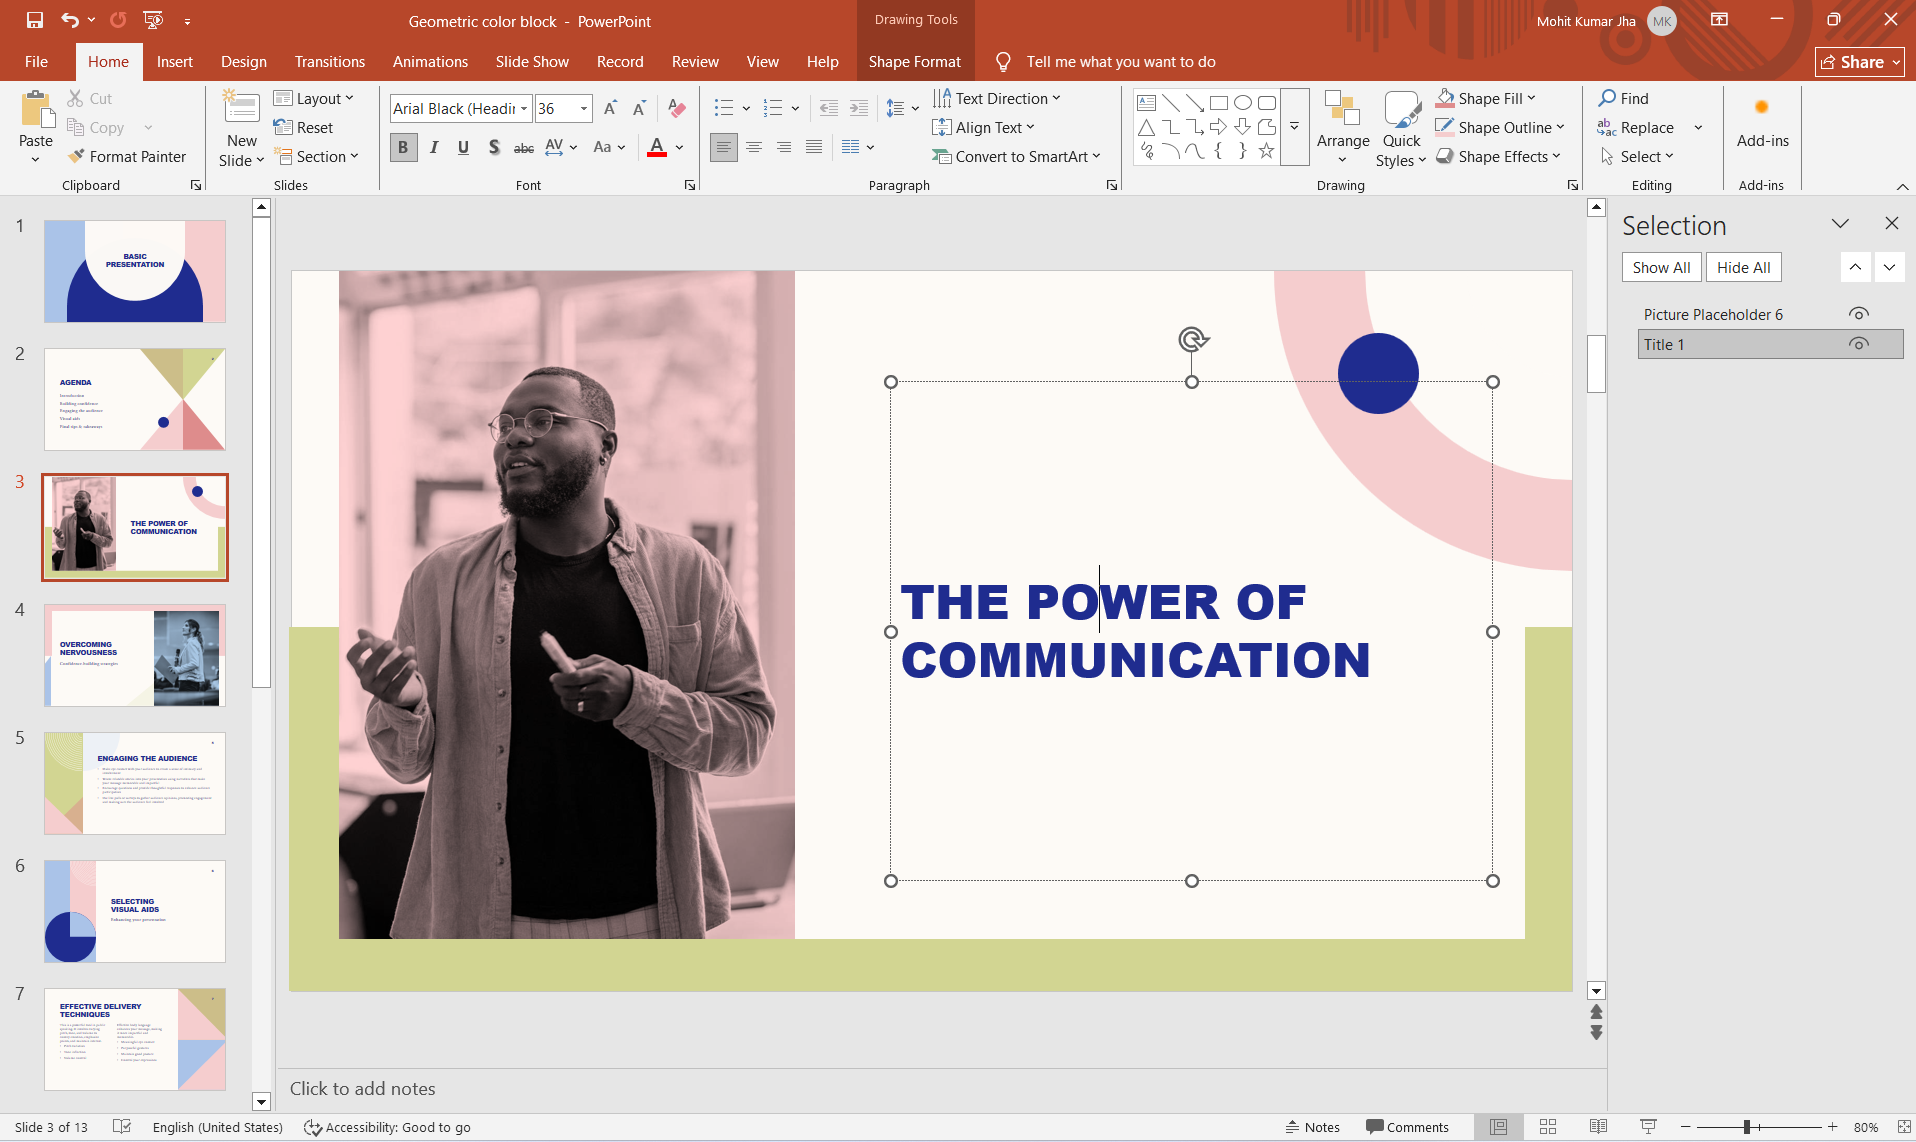
If you’re unsure which item corresponds to the object on your slide, click the eye icon next to each item to temporarily hide it. This makes it easier to identify specific objects, especially on slides containing many elements.
Step 3: Lock the Object
Once you’ve found the object, use the lock icon next to it in the Selection Pane.
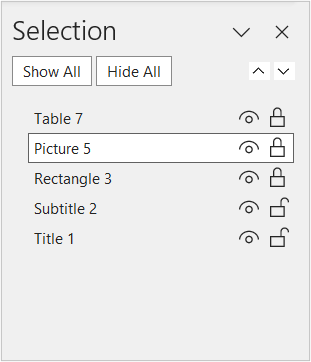
Click the lock icon, and the object will be locked in place. You can continue editing other elements on the slide without accidentally moving the locked object.
Tip: Lock background images, logos, decorative shapes, and other fixed design elements first. This can make editing the rest of your presentation much easier.
How to Lock Multiple Objects in PowerPoint
If your slide contains several elements that you want to keep in place, you don’t have to protect them one at a time. Locking multiple objects can be particularly useful for background graphics, logos, diagrams, and decorative elements that should remain fixed while you edit the rest of the slide.
Use the Selection Pane
The easiest way to manage multiple locked objects is through the Selection Pane:
- Go to Home → Arrange → Selection Pane.
- Review the list of objects on your slide.
- Identify the objects you want to protect.
- Click the lock icon next to each object.
Once locked, these elements won’t accidentally shift while you’re working on other parts of the presentation.
Lock Related Elements Together
If several objects form one visual element, for example, a logo made from a shape and text, you can also group the objects first. Select the elements, right-click, and choose Group → Group. You can then manage the grouped element as a single object.
This is especially helpful when your PowerPoint slide contains many overlapping shapes or design elements.
Pro tip: Don’t lock everything on a slide. Keep frequently edited text and content unlocked so you can make changes quickly, while locking only the elements that need to stay in a fixed position.
Create PowerPoint Presentations Faster with MagicSlides
Locking objects is useful when you’re refining a presentation and want to keep your carefully positioned elements in place. But if you’re creating presentations from scratch, the bigger challenge is often building the slides themselves.
That’s where MagicSlides AI PPT Maker can help. Instead of starting with a blank PowerPoint presentation, you can use AI to generate a presentation based on your topic, text, or existing content. This can help you create an initial slide structure much faster, which you can then customize and refine in PowerPoint.

Once your presentation is generated, you can use PowerPoint’s editing features, including object locking, grouping, and the Selection Pane, to fine-tune the final design.
Why Use MagicSlides?
MagicSlides can be useful when you need to:
- Create a presentation from a simple topic or prompt
- Turn existing content into structured slides
- Generate an initial presentation quickly
- Reduce the time spent designing slides manually
- Create a starting point that you can customize in PowerPoint
For example, if you’re preparing a business presentation, you could use MagicSlides to generate the initial deck, then open it in PowerPoint and adjust the layout, images, charts, and text. Once everything is positioned correctly, locking important objects can help prevent accidental changes.
Conclusion
Knowing how to lock an object in PowerPoint can make editing presentations much easier, especially when working with complex layouts. By using the Selection Pane, you can protect shapes, images, text boxes, and other important elements from accidental movement.
If you’re creating presentations from scratch, tools like MagicSlides can also help you generate and structure slides faster. Once your presentation is ready, PowerPoint’s locking and editing features give you greater control over the final design.
Frequently Asked Questions About Locking Objects in PowerPoint
Q1. Can I lock an object in PowerPoint?
Yes. In supported versions of PowerPoint, you can lock objects through the Selection Pane. This prevents them from being accidentally moved or edited while you work on other parts of the slide.
Q2. Can I lock multiple objects at once?
Yes. You can lock multiple objects individually through the Selection Pane. If several elements belong together, you can also group them and manage them as one element.
Q3. Can I lock an image in PowerPoint?
Yes. Images and pictures can be locked using the Selection Pane. This is particularly useful for logos, background images, and other graphics that need to stay in a fixed position.
Q4. How do I unlock an object in PowerPoint?
Open Home → Arrange → Selection Pane, find the locked object, and click its lock icon to unlock it. You can then select and edit the object normally.
Q5. Can I lock a text box in PowerPoint?
Yes, where the Lock feature is supported. Find the text box in the Selection Pane and click the lock icon to prevent accidental movement.
Q6. Why can’t I find the Lock option in PowerPoint?
The Lock feature can vary by PowerPoint version and platform. If the option isn’t available, you can use alternatives such as the Slide Master, grouping, or the Selection Pane to protect and manage slide elements.
Also read: How to Hide Slides in PowerPoint: A Step-by-Step Guide


