How to Change the Size of Google Slides: A Step-by-Step Guide


Learn how to easily change the size of Google Slides with step-by-step instructions, helpful tips, and custom dimension options.
Google Slides is a powerful tool for creating professional presentations, but many users struggle with customizing slide dimensions. Whether you're preparing a presentation for widescreen displays, social media, or printable materials like flyers, adjusting the size of your Google Slides can make a significant difference. In this guide, we’ll walk you through the steps to change the size of your slides, along with helpful tips to get the best results.
Why You Might Need to Change Slide Size
Before diving into the steps, let’s discuss why changing the slide size might be necessary:
- Display Adaptability: Different display settings, such as widescreen (16:9) or standard (4:3), require different aspect ratios. If you're presenting on a projector or different screens, matching the slide size ensures your content fits perfectly without black bars or cropping.
- Social Media or Print Designs: If you're designing a slide for social media platforms or printable materials, Google Slides offers the flexibility to adjust to the optimal size. Social media platforms have recommended sizes for images, and custom slide dimensions can help meet these specifications.
- Optimized Viewing Experience: Whether it’s a horizontal or vertical layout, resizing slides to match your audience's viewing experience makes a presentation more engaging.
How to Change the Size of Google Slides
Step by Step Guide to Change the Size of Google Slides
Step 1: Open Your Google Slides Presentation
To begin, open the Google Slides presentation for which you want to adjust the size. If you don't have a presentation open yet, go to Google Slides and create a new one or open an existing project.
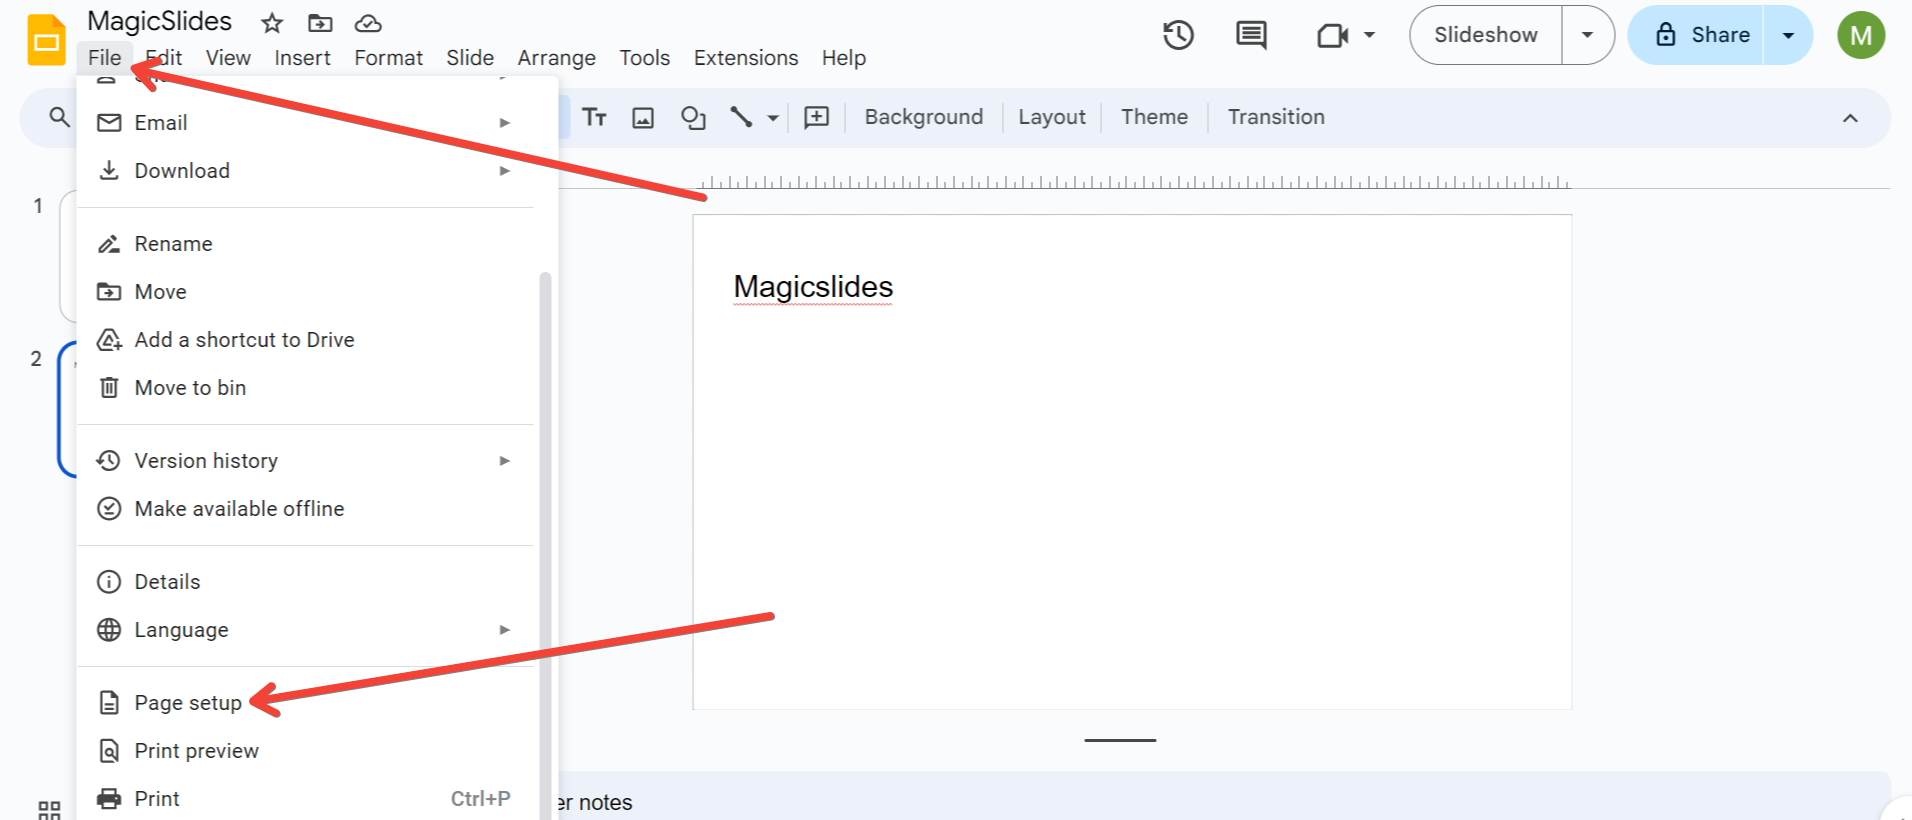
Step 2: Access the File Menu
Once your presentation is open:
- Navigate to the top-left corner and click "File" in the toolbar.
- In the dropdown menu, scroll down and select "Page Setup."
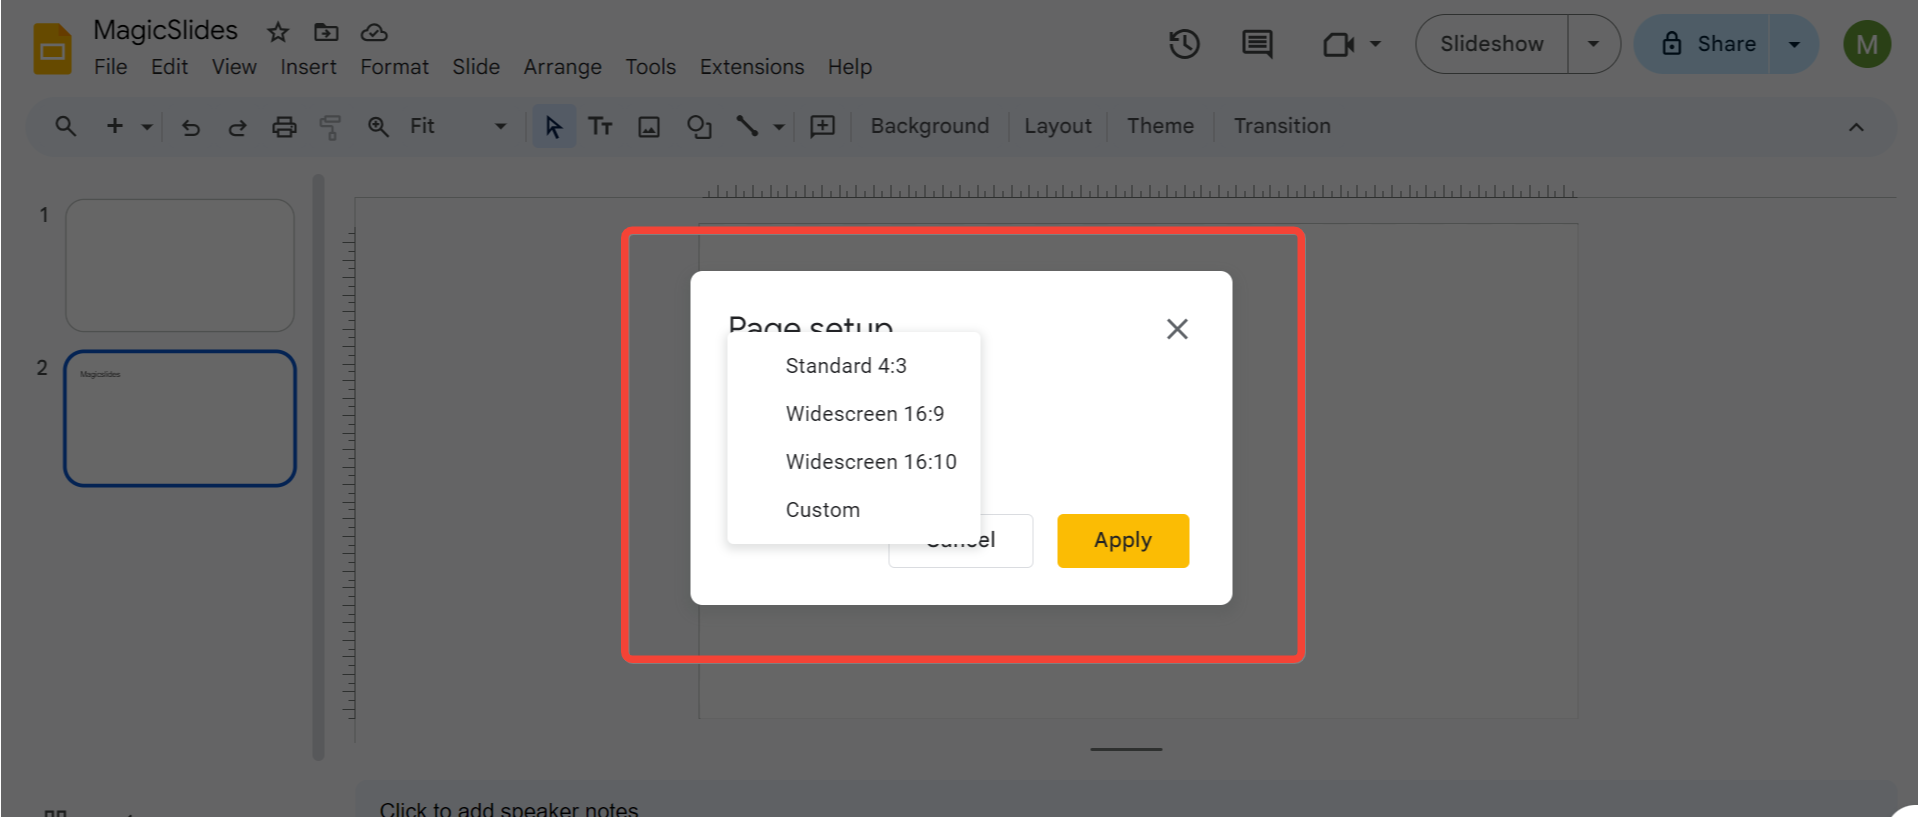
Step 3: Choose a Slide Size Option
Upon clicking "Page Setup," a dialog box will pop up with default size options.
- The default setting is Widescreen 16:9, but you can choose from other preset options:
- Standard 4:3: Common for older presentations and print formats.
- Widescreen 16:10: A slightly larger widescreen option.
- Custom: This is where you can enter any custom dimensions you need.
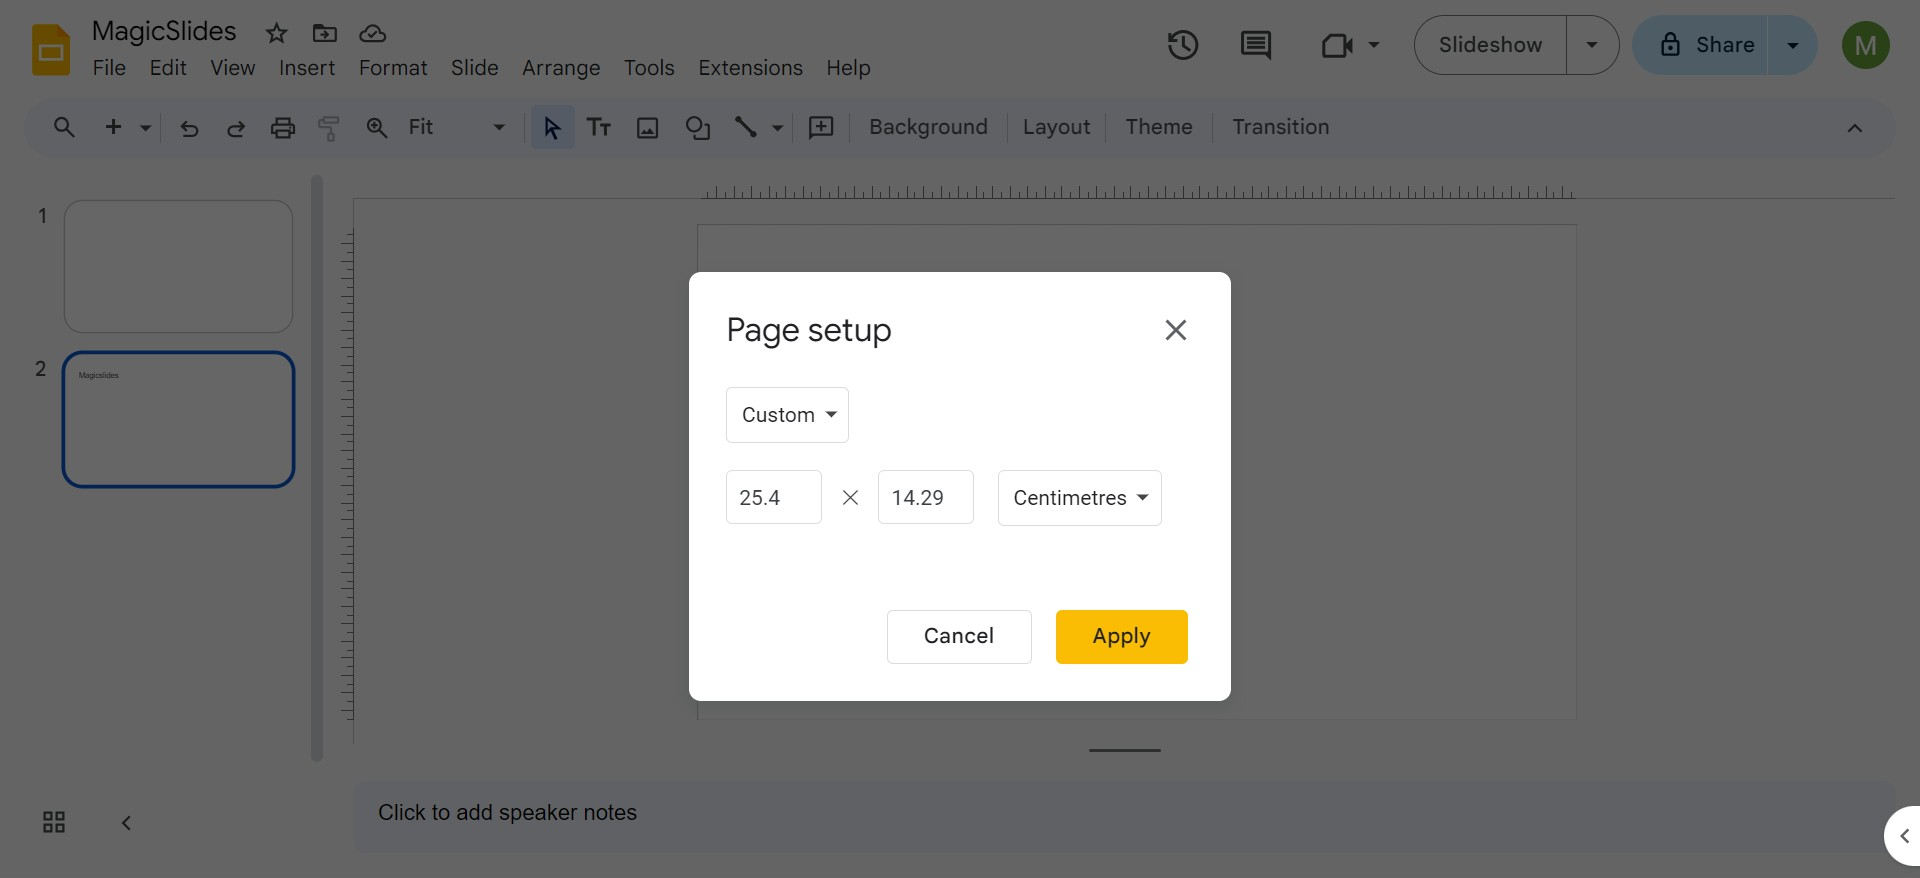
Step 4: Set a Custom Slide Size
To enter a custom size:
- Click the "Custom" option at the bottom of the dropdown.
- A new set of boxes will appear for you to input your dimensions.
Here, you can specify the exact dimensions in inches, centimeters, points, or pixels by typing in the numbers and selecting the unit of measurement you prefer (inches are the default). Make sure you have the correct dimensions for your intended purpose. For instance:
- 16:9 (Widescreen): This is usually 10 inches by 5.625 inches.
- 8.5 x 11 inches: Standard US letter size for printable materials.
- 1080 x 1920 pixels: A typical size for social media stories in vertical format.
Once you’ve entered your custom dimensions, click "Apply."
Step 5: Check Your Slide Layout
After you apply the new dimensions, your slides will adjust automatically to the new size. Be sure to check the layout of your existing slides—depending on how much you resized, you may need to move or resize your text boxes, images, and other elements to fit properly.
Step 6: Save or Export Your Slides
Once you’ve made the necessary adjustments to your slides, don’t forget to save your presentation. Google Slides saves changes automatically, but you can also download your slides in various formats like PDF, PowerPoint, JPEG, and PNG by clicking on File > Download.
💡
Additional Tips for Changing Slide Sizes in Google Slides
Here are a few extra tips to ensure you get the most out of resizing your slides:
1. Consider the Aspect Ratio
Always keep in mind the aspect ratio of your display or output medium. The 16:9 aspect ratio is commonly used for widescreens and projectors, while the 4:3 ratio is suitable for traditional monitors or smaller screens. If you’re preparing content for social media, vertical slides (e.g., 9:16 aspect ratio) are often better for platforms like Instagram Stories or TikTok.
2. Use Custom Sizes for Printing
When designing content that will be printed, it’s often helpful to enter specific dimensions. For instance, if you're designing flyers or posters, you might set the slides to 8.5 x 11 inches or A4 paper size. This ensures that when you print the slides, they will match the desired output without cutting off important content.
3. Ensure Image Quality
When resizing slides, especially for custom sizes, the quality of your images and graphics matters. Always use high-resolution images so that they remain sharp and clear, even when scaled to different slide sizes.
4. Mind the Margins
If you're adjusting slide sizes for printing, ensure that your content doesn't stretch too close to the edge of the slide. Some printers have a "no print zone," so keeping your content within safe margins ensures it prints as intended.
5. Test for Different Screen Sizes
Before finalizing a presentation, test it on different devices or projectors. This ensures that your content fits well on all screens. You can also use Presenter View in Google Slides to preview how your presentation will look on different aspect ratios.
6. Resize Specific Slides Individually
Unfortunately, Google Slides doesn’t allow you to change the size of individual slides in the same presentation. However, if you need different slide sizes within a project, you can create separate presentations with different sizes and then export them as images or PDF files to combine in external tools.
7. Keep Proportions Consistent
If you decide to resize your presentation after it's already built, ensure that you maintain the proportions of images, videos, and graphics. Resizing content unevenly could lead to stretched or squished visuals, which might compromise the professional look of your slides.
8. Backup Before Resizing
Before making significant changes to the size of a Google Slides presentation, it’s always a good idea to duplicate the presentation. This way, you have a backup of the original design in case something doesn’t work out after resizing.
Conclusion
Customising the size of your Google Slides can be a game-changer for presenting across various platforms or creating media-specific designs. By following these steps, you can ensure your presentation is optimised for any display or print scenario. Whether you’re creating a slideshow for a widescreen projector, a social media post, or a printable flyer, Google Slides offers the flexibility to match your specific needs.
Don't forget to experiment with custom sizes for creative projects, and always preview your slides on the intended output medium to ensure they look their best!
FAQs
Q: Can I change the size of individual slides? A: Unfortunately, Google Slides does not allow you to resize individual slides within the same presentation. However, you can create different presentations with unique sizes and combine them later as PDFs or image files.
Q: What’s the best size for Instagram stories? A: The optimal slide size for Instagram Stories is 1080×1920 pixels, which corresponds to a 9:16 aspect ratio.
Q: How can I ensure that my images stay sharp after resizing? A: To avoid quality loss, use high-resolution images and ensure that the image dimensions match or exceed the slide size you’re setting.
Q: Can I change the unit of measurement in Google Slides? A: Yes, Google Slides allows you to enter custom dimensions in inches, centimeters, points, or pixels when setting up a custom slide size.


