How to Record on Canva: Complete 2026 Tutorial


How to record on Canva hassle-free. Learn how to record voice on Canva and create professional presentations quickly. Best tricks explained.
How to Record on Canva: Step-by-Step Guide to Record Voice & Presentations
If you’re looking for a simple way to create presentations or voiceovers without any external help, Canva is the most preferred service across the world. In this guide, I’ll show you how to record on Canva, including how to record voice on Canva, so that you can create professional-quality content in just a few clicks.
If you’re just getting started with presentations, I recommend first understanding how to create a presentation in Canva, because this is the initial step.
But do you know why only Canva, not any service? If not. First, it’s important to understand why Canva’s recording feature has become a go-to option for creators like me.
What Does “Record on Canva” Mean?
The term “record on Canva” refers to using Canva’s built-in option to capture things directly within the platform, i.e.
- Audio
- Video
- Screen activity
It removes the need to switch between different tools. Everything, from creating slides to adding voiceovers, can be handled in one place.
This functionality is helpful for anyone looking to create professional-looking content without dealing with complicated setups. To understand why this feature is so useful, it’s worth exploring the key capabilities that Canva offers for recording.
Key Features of Canva Recording
Canva’s recording feature is simple to use but still gives enough options to create professional-looking content. It brings everything into one place, so recording, editing, and sharing can be done without switching tools. Here are some key features that make it useful:
- Built-in voice recorder
- Webcam recording support
- Screen + presentation recording
- Built-in editing tools for trimming, adjusting, and refining recordings
- Share recordings instantly via link or download
- Cloud-based access (no installation needed)
- User-friendly interface that’s easy to understand, even for beginners
- Record directly within existing Canva projects without exporting files
These features make recording on Canva quick and easy. Everything can be done in one place without any extra setup.
Before learning how to record on Canva, the first step is usually creating the slides. This is where the process can take time, especially when starting from scratch. To make this easier, leverage AI tools like MagicSlides AI PPT Generator to quickly generate complete presentations without manual effort.
Instead of designing each slide one by one, it allows generating structured slides from:
…and even URLs.
This makes it much easier to move directly to Canva for recording, rather than spending time on slide creation. However, you can also add voice, music, and video to PPT via this MagicSlides solution. For the same, you just have to upload your voice file, and write a text like “add uploaded voiceover in this presentation,” and the rest will do automatically.
Now, let’s look at how to record on Canva step by step.
How to Record on Canva?
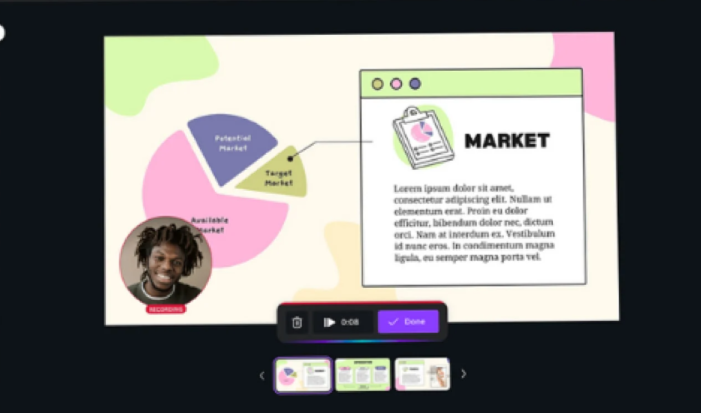
Recording on Canva doesn’t require any technical setup. The process is straightforward and can be completed in just a few clicks, even for first-time users. By following the steps below, it becomes easy to record presentations or create simple videos directly within the platform:
- Run Canva and open an existing design, or create a new one, like a presentation, an Instagram post, or something as desired.
- At the top-right corner, click Present.
- Then select “Present and Record.”
- Canva will ask for permission, allow all:
- Click “Start Recording”
- Canva gives a countdown
- Begin presenting slide-by-slide
- Once done, click End Recording
- Canva automatically generates a shareable video link
Once the recording is complete, the generated video can be:
- Reviewed
- Shared
- Downloaded
This makes it easy to reuse the content for presentations or social media. While this covers a full recording, sometimes only voice narration is required.
IMP NOTE: If you are from India, then Canva doesn’t provide an option to record yourself for Indian traffic.

You can use a VPN to leverage Canva for the same
In the next section, I’ll show you how to record voice on Canva.
How to Record Voice on Canva?
Recording only voice in Canva is easy and doesn’t require using the full presentation recording option. It lets you add audio directly to your design. For the same, here are two different tricks:
#Method 1. Using Present & Record
- Open your design in Canva
- Click Present > Present and Record
- Turn off the camera if not needed
- Allow microphone access
- Click Start Recording and record your voice
- Click End Recording to save
#Method 2. Upload Voice Recording
- Record audio using your phone or mic
- Open Canva and go to Uploads

- Click Upload Media and add your audio, or you can Record Yourself directly here.
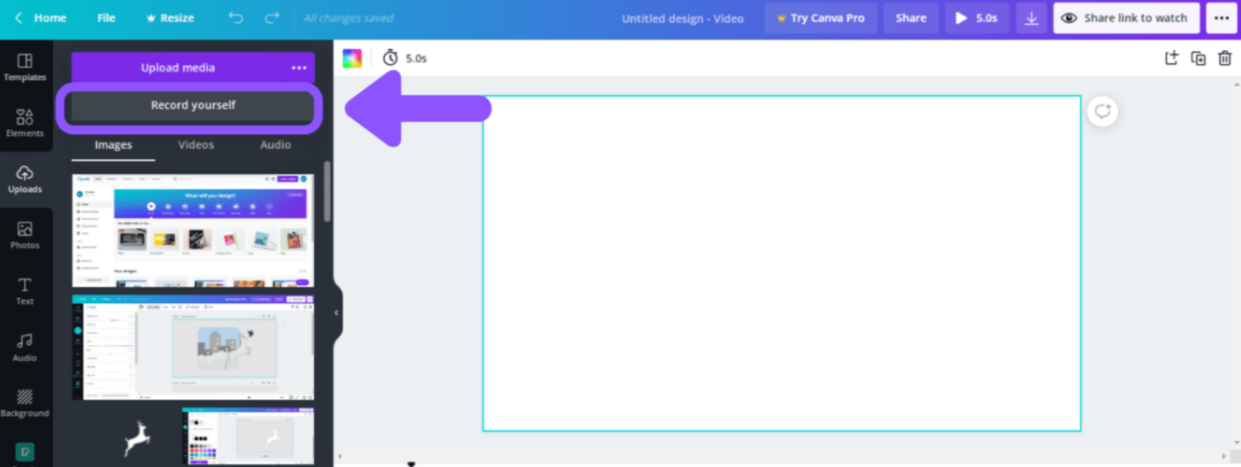
- Drag and drop it into your design timeline
- Adjust timing as needed
Both methods work well depending on the requirement:
- The first method is useful for quick recordings directly inside Canva
- The second one is better for audio quality and editing
Once the audio is ready and added, the next step is to properly place and sync it with the design. However, you can further improve your presentation by adding background audio or narration.
For example, learning how to add music to Canva slideshow can make your presentations more engaging and professional.
Now, let’s look at how to add voiceover to Canva designs.
How to Add Voiceover to Canva Designs?
Adding a voiceover to Canva designs is a simple way to make content more engaging and easy to understand. Once the audio is recorded or uploaded, it can be placed directly into the design and adjusted as desired.
Here are the steps to do this:
- Open your design in Canva (presentation or video)
- Go to the Uploads tab from the left panel
- Click Upload files and select your audio (MP3, WAV, etc.)
- Once uploaded, drag and drop the audio onto your design timeline
- To record directly inside Canva:
- Adjust the audio on the timeline:
- Click on the audio track to:
- Preview your design to check if everything is perfect
- Once done, click Share > Download to export your final video with voiceover
Once everything is properly synced, your design is ready to be shared or downloaded as a complete video with voiceover.
How to Record on Canva Hassle-free – Best Practices to Follow
Recording on Canva can be smooth and hassle-free with a few simple practices in place. Here’re those:
- Use a good microphone for clear audio
- Record in a quiet environment to reduce background noise
- Do a short test recording before the final one
- Speak slowly and clearly while presenting
- Keep a simple script or notes for better flow
- Turn off the camera if not needed to avoid distractions
- Check internet stability to prevent interruptions
- Preview the recording before sharing or downloading
- Trim or edit any unwanted parts for a polished result
- Keep slides clean and avoid too much text; instead of long paragraphs, use bullet points
- Always allow necessary browser permissions, as this can lead to the microphone not working issue
- Avoid noisy surroundings if you feel poor audio quality while presenting.
- During the presentation, ensure to close extra tabs to avoid recoding lag-type issues
Following these simple practices helps ensure a professional-looking presentation. Additionally, it is always recommended to improve visuals by following guides like how to improve slide design for presentations, to make your content more impactful.
When Should You Use Canva Recording?
Canva recording is useful when there is a need to quickly create and share content without relying on technical setups. It works well for creating:
- Presentations
- Tutorials
- Training videos
- Simple explainers
- Social media content
But if you need heavy editing or advanced production, I prefer tools like MagicSlides.
Canva Recording vs Traditional Screen Recorders
Canva recording is best for creating quick and simple videos without any setup. It works directly in the browser and lets you do many things in one place, such as:
- Design
- Record
- Share
This makes it a good option for:
- Presentations
- Tutorials
- Voiceovers
Traditional screen recorders (like OBS Studio, Camtasia, Bandicam, etc) allow recording the:
- Full screen
- Specific apps
- System audio
They come with advanced editing options. However, they require installation and can be a bit harder to use for beginners.
In simple terms:
- Canva is for fast and easy recording
- Traditional tools are for more detailed and professional work
Author’s Verdict
Learning how to record on Canva is one of the easiest ways to create professional-looking content without technical expertise.
If you’re just starting, then:
- Begin with simple voice recordings
- Experiment with different formats
And if your goal is specifically how to record voice on Canva, the built-in tools are more than enough to get started. However, for advanced modifications, bulk PPT creation, and the need for results quickly, opt for MagicSlides.
People Also Ask
Q. Is Canva recording free?
Yes, most of the advanced features you can leverage in Canva’s free plan. However, for every feature like premium templates, background remover, advanced editing tools, etc, you have to upgrade to the Canva Pro version.
Q. Can I record a screen on Canva?
Yes, using Present and Record, you can capture slides and webcam together.
Q. How to record voice on Canva without video?
Disable the camera and use only the microphone. Here’s how:
- Open your design in Canva
- Click Present at the top-right corner
- Select Present and Record
- When the recording screen opens, turn off the camera
- Allow microphone access
- Click Start Recording
- Speak and record your voice while going through slides
- Once done, click End Recording
- Canva will generate a shareable recording link
Q. Can I download the recording?
Yes, you can download it as a video file or share via link. Follow these steps:
- Open your recorded design in Canva
- Click Share at the top-right corner
- To download:
- To share via link:


