How to Remove Background in PowerPoint: Step-by-Step Guide


Learn how to remove a background in PowerPoint using the built-in Remove Background tool. Follow simple steps to remove image and white backgrounds.
Want to remove a background in PowerPoint without using Photoshop or another image editing tool? PowerPoint has a built-in Remove Background feature that can automatically separate the main subject of a picture from its background.
Whether you want to remove the background from an image, make a picture transparent, or remove a white background, PowerPoint can handle the job in just a few steps.
In this guide, you’ll learn how to remove a background from a picture in PowerPoint, refine the areas PowerPoint selects, and save the edited image for use in your presentation or other projects.
Quick answer: Select your image in PowerPoint, go to Picture Format → Remove Background, adjust the areas to keep or remove, and then select Keep Changes. PowerPoint will remove the selected background while keeping the main subject.
Step-by-Step Guide to Remove a Picture Background in PowerPoint
Step 1. Insert the Image into PowerPoint
Open Microsoft PowerPoint and navigate to the slide where you want to place the image.
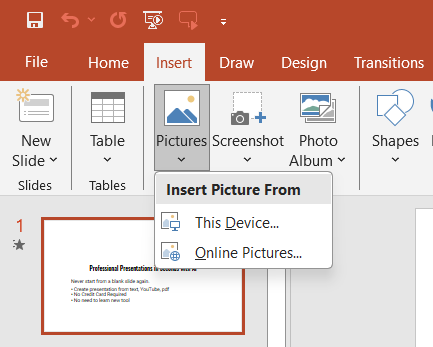
Click on the “Insert” tab in the top ribbon. Select “Pictures” and choose “This Device” to upload an image from your computer.
Step 2. Select the Image
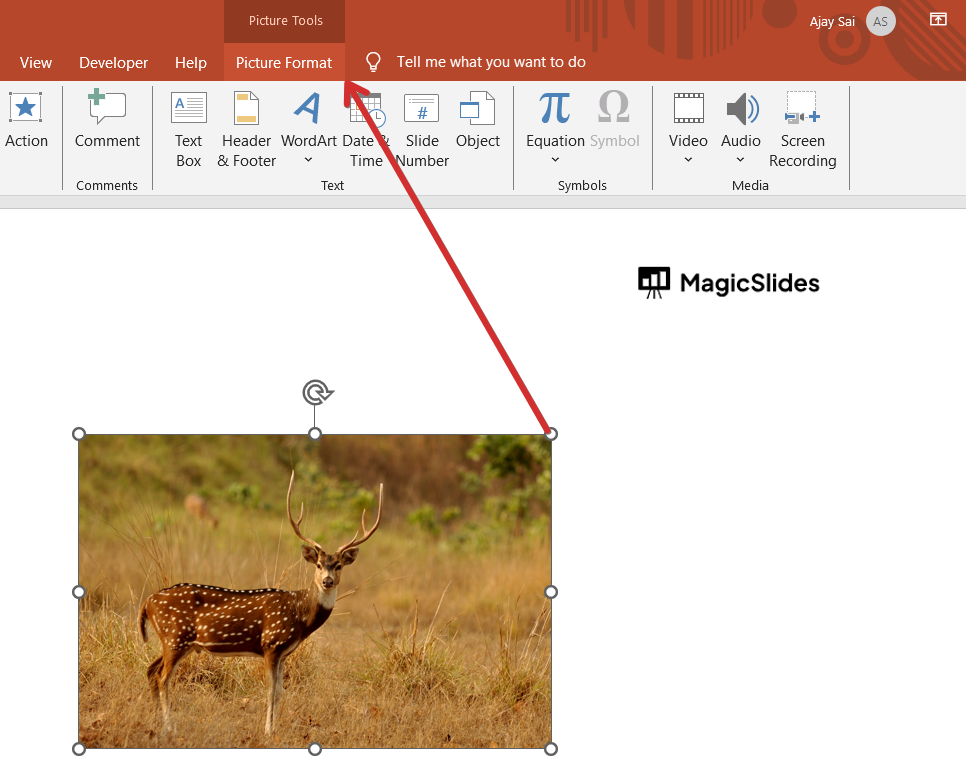
Click on the image to select it. Once selected, the “Picture Format” tab will appear in the ribbon at the top.
Step 3. Click on “Remove Background”
In the “Picture Format” tab, locate the “Remove Background” button in the “Adjust” group.
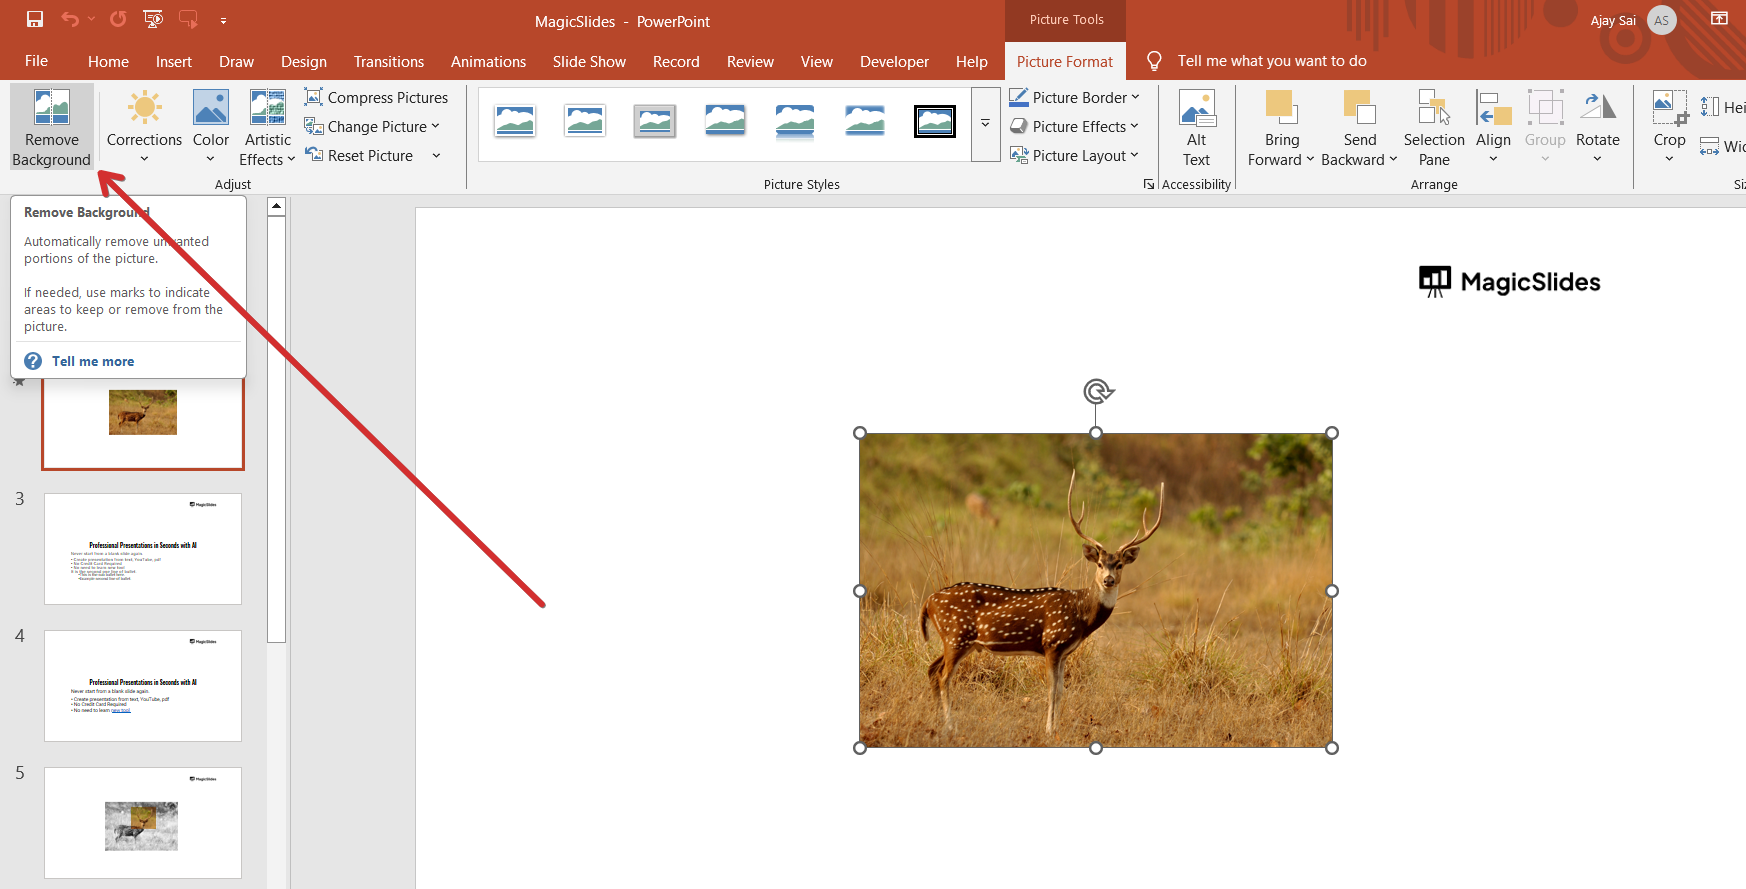
Click on it, and PowerPoint will automatically detect and highlight the background in purple.
Step 4. Adjust the Selection
If PowerPoint removes parts of the main subject, click on “Mark Areas to Keep” and manually select those parts.
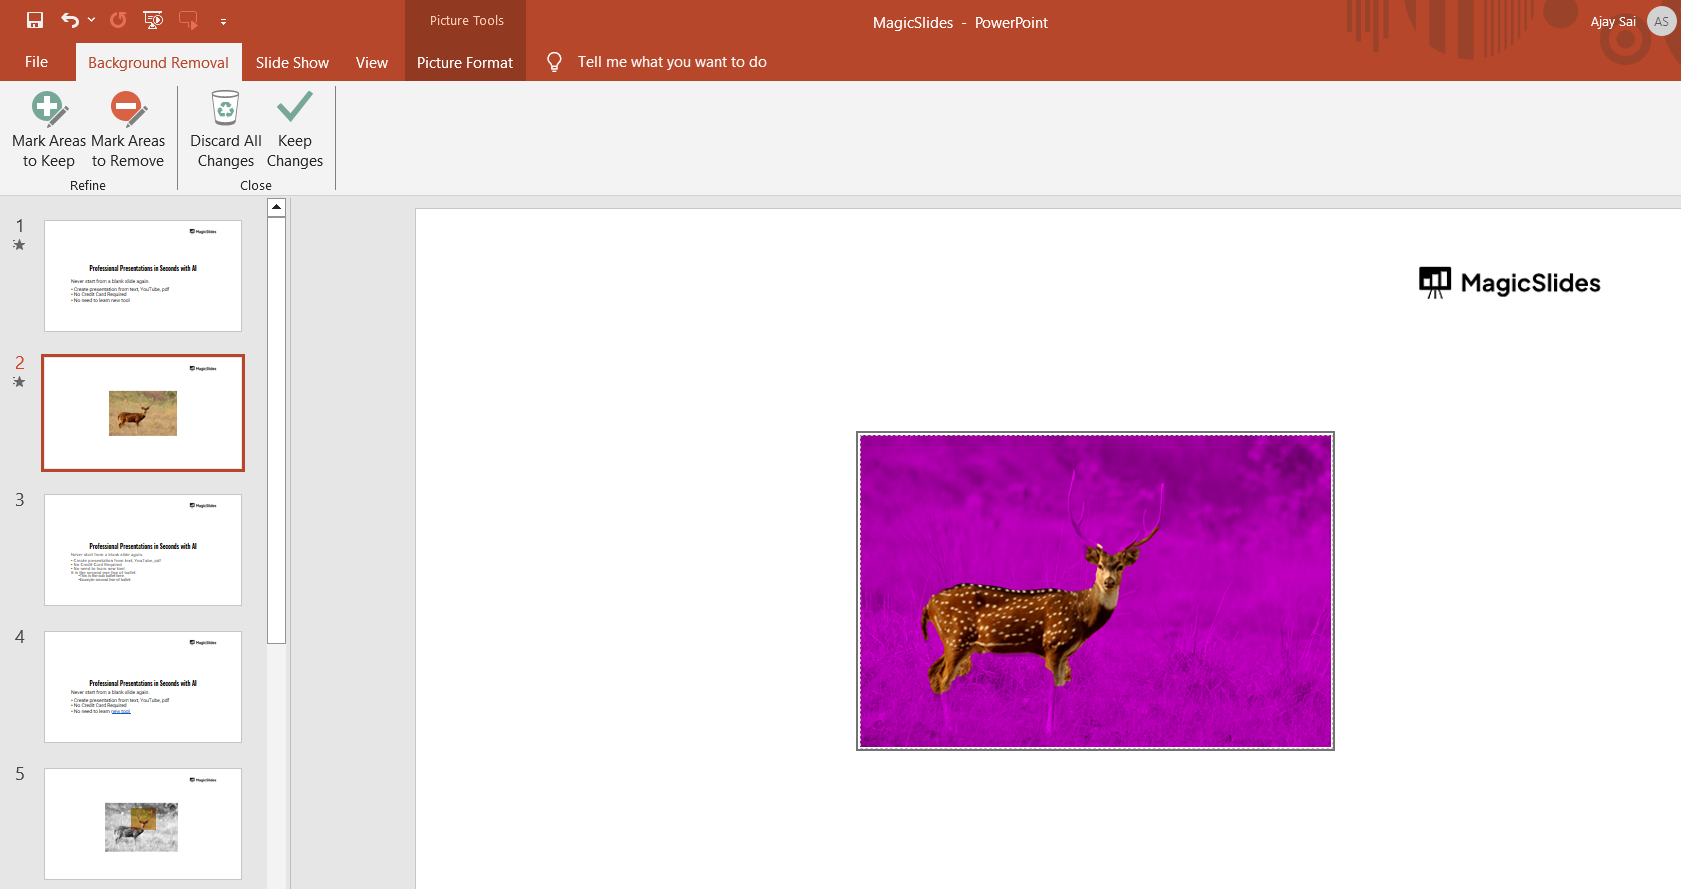
If some background areas are still visible, click on “Mark Areas to Remove” and highlight them for removal.
Use your cursor to draw over the areas that need adjustment.
Step 5. Apply the Changes
Once you are satisfied with the selection, click on the “Keep Changes” button.
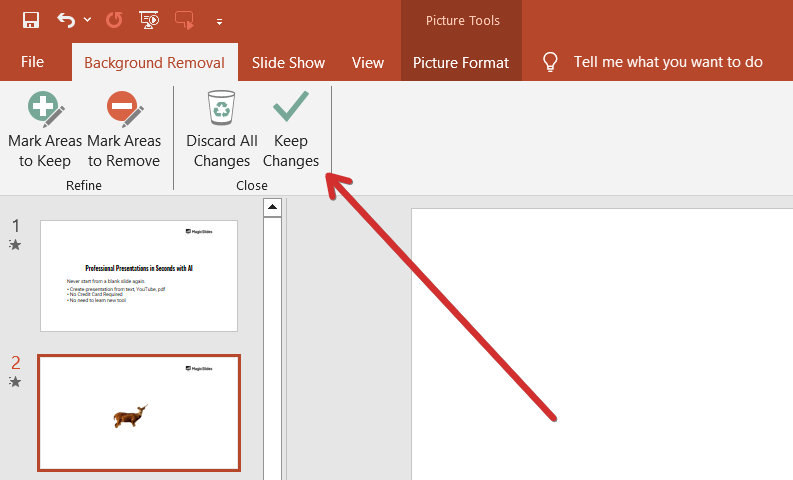
PowerPoint will now remove the background, keeping only the main subject of the image.
Step 6. Save or Use the Edited Image
To save the image with the removed background, right-click on it and select “Save as Picture.”
You can now use the edited image in your PowerPoint slides without an unnecessary background.
Can You Remove the Background From Any Picture in PowerPoint?
PowerPoint can remove backgrounds from many types of images, but the results depend on the complexity of the picture.
Images with a clearly defined subject and simple background are generally easier to process. Images with similar colors between the subject and background, complicated edges, or multiple overlapping objects may require more manual adjustments.
If the automatic result isn’t accurate, use Mark Areas to Keep and Mark Areas to Remove until you get the desired result.
How to Make an Image Background Transparent
Select the image → Picture Format → Remove Background → adjust Mark Areas to Keep/Remove → click Keep Changes.
For a simple solid-color background, use Picture Format → Color → Set Transparent Color.
How to Remove a White Background
Select the image → Picture Format → Color → Set Transparent Color → click the white background.
For complex white backgrounds, use Remove Background and manually refine the selection.
How to Remove a PowerPoint Slide Background
Select the slide → Design → Format Background.
To restore the default background, select Reset Background.
For template graphics that can’t be selected, go to View → Slide Master and remove or edit the background elements.
How to Save an Image With a Transparent Background
After removing the background, right-click the image → Save as Picture → choose PNG.
PNG preserves transparent areas, while JPEG does not.
What Does the Purple Area Mean?
When you activate the Remove Background tool, PowerPoint places a purple overlay over the areas it has identified as the background.
The parts of the image that remain unmarked are generally the areas PowerPoint intends to keep.
This preview lets you check the result before permanently applying the background removal.
How to Get More Accurate Results
PowerPoint’s automatic detection works well when the subject is clearly separated from the background. For more complicated images, you may need to refine the selection manually.
For the best results:
- Use images where the subject has clear edges.
- Make sure there is reasonable contrast between the subject and background.
- Use Mark Areas to Keep for important parts of the subject.
- Use Mark Areas to Remove for background sections PowerPoint misses.
- Zoom in when refining small or detailed areas.
- Pay particular attention to hair, transparent objects, shadows, and other fine details.
Does Removing a Background Make the Image Transparent?
Yes. When PowerPoint removes the background from a picture, the removed area becomes transparent within the presentation.
If you save the edited image as a PNG, the transparent areas can also be preserved in the exported image.
This makes PowerPoint’s background removal feature useful for creating cutout images, logos, product images, presentation graphics, and other visual elements that need to work over different backgrounds.
Create Professional Presentations Faster With MagicSlides
Removing an image background is useful when you’re polishing individual slides, but creating an entire professional presentation can take much more time.
If you’re looking for a faster way to create presentations with AI, MagicSlides can help. Instead of starting with a blank PowerPoint and manually designing every slide, you can use AI to turn your ideas, text, documents, or topics into a structured presentation.

With MagicSlides, you can:
- Generate presentation slides with AI
- Turn ideas and content into a complete presentation
- Create professionally structured slide decks faster
- Customize and edit your presentation after it’s generated
- Spend less time formatting slides manually
So, if you’re finished removing the background from your image and want to build the rest of your presentation faster, try MagicSlides and create a presentation with AI.
Conclusion
Removing a background in PowerPoint is a simple way to create cleaner and more professional presentation visuals. With the built-in Remove Background tool, you can quickly separate a person, product, logo, or other subject from its original background without using separate image-editing software.
For the best results, use Remove Background for complex images and Set Transparent Color when you’re working with a simple, solid-color background. After editing the image, save it as a PNG if you want to preserve its transparent background.
Whether you’re removing a picture background, making an image transparent, or cleaning up a white background, PowerPoint provides the tools you need directly within the presentation.
Also read: How to Delete a Slide in PowerPoint: Easy Step-by-Step Guide
Frequently Asked Questions About Removing Backgrounds in PowerPoint
Q1. Can I remove the background from a picture in PowerPoint?
Yes. PowerPoint has a built-in Remove Background tool that can automatically identify and remove the background from a picture. You can manually refine the selection using Mark Areas to Keep and Mark Areas to Remove.
Q2. How do I remove a background in PowerPoint?
Select the picture, open Picture Format, and select Remove Background. Adjust the areas PowerPoint identifies if necessary, then click Keep Changes.
Q3. How do I make an image transparent in PowerPoint?
Select the image and use Picture Format → Remove Background to remove unwanted areas. For an image with a simple solid-color background, you can also use Picture Format → Color → Set Transparent Color.
Q4. How do I remove a white background from an image in PowerPoint?
For a plain white background, select the image and use Picture Format → Color → Set Transparent Color, then click the white background. For more complicated images, use Remove Background and manually refine the selection.
Q5. Does PowerPoint automatically remove image backgrounds?
Yes. PowerPoint’s Remove Background tool automatically analyzes the image and identifies the area it believes is the background. You can then manually adjust the selection before applying the changes.
Q6. Can I save a PowerPoint image with a transparent background?
Yes. After removing the background, right-click the image and select Save as Picture. Choose PNG to preserve transparent areas.
Q7. Why is PowerPoint removing part of my image?
PowerPoint’s automatic detection may mistake part of the subject for background, particularly when the subject and background have similar colors or when the image contains fine details. Use Mark Areas to Keep to restore those parts.
Q8. Can I remove the background from a logo in PowerPoint?
Yes. PowerPoint can remove backgrounds from logos and other graphics. If the logo has a simple, solid-color background, Set Transparent Color may be faster. For more complex backgrounds, use Remove Background.
Q9. Can I remove the background from a picture in PowerPoint without Photoshop?
Yes. You don’t need Photoshop for many common background-removal tasks. PowerPoint’s built-in Remove Background tool can isolate the main subject directly inside your presentation.
Q10. Can I remove the background from an entire PowerPoint slide?
Yes, but the process is different from removing the background of an image. To change a slide’s background, use Design → Format Background. If the background consists of template graphics, you may need to edit the presentation through View → Slide Master.
Also read: What Is an Infographic Presentation? Examples, Types & How to Create One


